JTapi hands-on, part II

Search for a command to run...
No comments yet. Be the first to comment.
Managing the cost of your cloud infrastructure can be a complex and daunting task, especially as your organization grows and the number of resources increases. One way to handle this challenge is to use a tool like Infracost, which allows you to see ...

There are times when you have to integrate into a proprietary or legacy system, most of the time, using an API to implement the integration. Testing such integration with a proprietary or legacy system can be complex, if possible at all, since most o...
H2 database is a powerful Java SQL database that is very fast, implements JDBC API, provides an html console, and has a very small footprint, around 2MB. Because of its size and the SQL compatibility that the H2 database provides, it can be used as a...

RFC3263 describes the DNS procedure and guidelines to be followed in order to locate SIP Servers. From the abstract of RFC3263: The Session Initiation Protocol (SIP) uses DNS procedures to allow a client to resolve a SIP Uniform Resource Identifier ...

This is the next article in the JTapi hands-on series that will present the Call and Connection interfaces from the Jtapi API. Using the Call and Connection interface, this article shows how to create and disconnect calls, and also inspect Connections of a call. This tutorial could be the base for a dialler application or a connector for a PBX with a CRM application.
Also please note that this article builds upon the previous articles JTapi Overview and JTapi hands-on, part I.
In the Resources section of this articles you can find the source code for the examples. In order to compile and run the source code you need the JTapi library in your classpath and of course a PBX equipped with the appropriate JTAPI software services. For any help please leave a comment.
For the concepts and theories to be more easy to grasp, I will start by providing a specific use case to work with.
For this we need to develop a library which will be the connector between the application and the JTapi enabled PBX. The purpose of this library will be to create calls on behalf of the users and deliver the calls to their telephone set. So for the rest of the article I will provide the necessary theory and examples with source code to develop such a library.
First will have some theory in order to get the basics of Call and Connection interface, since these two interfaces are the fundamentals in the application we want to develop.
The Call object represents a telephone call, the information flowing between the service provider and the call participants. A telephone call comprises a Call object and zero or more connections. In a two-party call scenario, a telephone call has one Call object and two connections. A conference call is three or more connections associated with one Call object.
In order to create a Call, an idle call object is instantiated using Provider.createCall(). Having the idle call object in place, the application must specify the originating Terminal (physical endpoint) and the originating Address (logical endpoint) of that Terminal (in the case that a Terminal has multiple telephone numbers on it). Next the application should provide the destination telephone number as a string. Two Connection objects are returned from the Call.connect() method, representing the originating and destination ends of the telephone call.
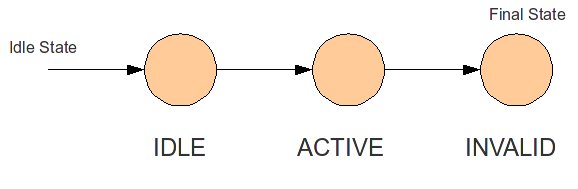
A Call, like other Jtapi objects, has a state which is obtained via the Call.getState() method. This state describes the current progress of a telephone call, where is it in its life cycle, and how many Connections exist on the Call. The Call state may be one of three values: Call.IDLE, Call.ACTIVE, or Call.INVALID. Here is a description of each state:
Note: The Connection states mentioned above will be discussed later in this article.
The possible Call state transitions are given in the diagram below:
A Call object maintain a list of the Connections on that Call. Applications obtain an array of Connections associated with the Call via the _Call.getConnections()_ method. A Call object retains a reference to a Connection only if it is not in the Connection.DISCONNECTED state. Therefore, if a Call object has a reference to a Connection, then that Connection must not be in the Connection.DISCONNECTED state. When a Connection moves into the Connection.DISCONNECTED state (e.g. when a party hangs up), the Call loses its reference to that Connection which is no longer reported via the _Call.getConnections()_ method.
A Connection represents a link (i.e. an association) between a Call object and an Address object.
The purpose of a Connection object is to describe the relationship between a Call object and an Address object. A Connection object exists if the Address is a part of the telephone call. Applications use the _Connection.getCall()_ and _Connection.getAddress()_ methods to obtain the Call and Address associated with this Connection, respectively.
A connection can be in one of the states mentioned below and here is a description of each Connection state in real-world terms. These real-world descriptions have no bearing on the specifications of methods, they only serve to provide a more intuitive understanding of what is going on. Several methods in this specification state pre-conditions based upon the state of the Connection (for example see Connection.disconnect() method below)
With these loose, real-world meanings in the back of one’s mind, the Connection class defines a finite-state diagram which describes the allowable Connection state transitions. This finite-state diagram must be guaranteed by the implementation. Each method which causes a change in a Connection state must be consistent with this state diagram. This finite state diagram is below:
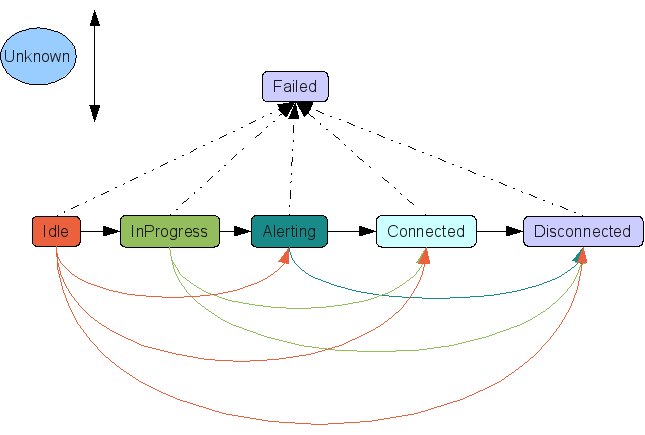
Note there is a general left-to-right progression of the state transitions. A Connection object may transition into and out of the Connection.UNKNOWN state at any time (hence, the asterisk qualifier next to its bidirectional transition arrow).
In terms of controlling a call, an important method of the Connection interface is the Connection.disconnect() method. This method drops an entire Connection from a telephone call. The result of this method is to move the Connection object into the Connection.DISCONNECTED state.
This method drops a Connection from an active telephone call and the Connection’s Address is no longer associated with the telephone call. Important to notice is that this method does not necessarily drop the entire telephone call, only the particular Connection on the telephone call. The method provides the ability to disconnect a specific party from a telephone call, which is especially useful in telephone calls consisting of three or more parties. For example on a three party conference call, if one of the parties invoke the _Connection.disconnect()_ method, then this party leaves the conference call, but the two parties left continue the call. Invoking this method may result in the entire telephone call being dropped though, which is a permitted outcome for this method. In that case, the appropriate events are delivered to the application, indicating that more than just a single Connection has been dropped from the telephone call.
This method returns successfully only after the Connection has been disconnected from the telephone call and has transitioned into the Connection.DISCONNECTED. Note that this method waits (i.e. the invocating thread blocks) until either the Connection is actually disconnected from the telephone call or an error is detected and an exception thrown.
Additional Connections may be dropped indirectly as a result of this method. For example, dropping the destination Connection of a two-party Call may result in the entire telephone call being dropped. It is up to the implementation to determine which Connections are dropped as a result of this method. Implementations should not, however, drop additional Connections if it does not reflect the natural response of the underlying telephone hardware.
Dropping additional Connections implies that their TerminalConnections are dropped as well. Also, if all of the Connections on a telephone call are dropped as a result of this method, the Call will move into the Call.INVALID state.
Be aware that the Connection object must be in one of several states in order for this method to be successfully invoked. These allowable states are: Connection.CONNECTED, Connection.ALERTING, Connection.INPROGRESS, or Connection.FAILED. If the Connection is not in one of these allowable states when this method is invoked, this method throws InvalidStateException. Having the Connection in one of the allowable states does not guarantee a successful invocation of this method.
Next will be discussed the structure of the project will be used for the library we need to implement the application in question.
The project has a bootstrap class, the ProviderService class, that provides the Jtapi Provider for the rest of the classes to use. This is convenient to have since several other classes can access the Provider (to retrieve resources, create calls etc.) without the need for each class to instantiate its own Provider object.
Next is the JTapiMakeCall class that is responsible to create and handle calls and side by side the CallTools class that provides useful information on the console about the progress of a call.
Even though this is a simple application, later can be used as a tool to create calls.
As usual, the kick off of any JTapi project is the instantiation of JtapiPeer and Provider, and here is exactly that. So below is the ProviderService class that will make available the Provider to the rest of the project.
import javax.telephony.JtapiPeer;
import javax.telephony.JtapiPeerFactory;
import javax.telephony.JtapiPeerUnavailableException;
import javax.telephony.Provider;
public class ProviderService {
private static ProviderService instance;
private static Provider provider;
private ProviderService () {
    bootStrap();
}

public static Provider getProvider () {
    if (instance == null) {
        instance = new ProviderService();
    }
    return provider;
}

private void bootStrap () {
    try {
        JtapiPeer peer = JtapiPeerFactory.getJtapiPeer("");
        String\[\] myServices = peer.getServices();
        String providerString = myServices\[0\] + ";login=user;passwd=passwd";
        provider = peer.getProvider(providerString);
    } catch (JtapiPeerUnavailableException e) {
        e.printStackTrace();
    }
}
}
Having the Provider available for the rest of the project, we are ready to move on the rest of the classes.
The JTapiMakeCall class consists of 4 methods.
Following is the source code of the JTapiMakeCall class:
package org.devrealm.jtapitutorial2.jtapimakecall;
import javax.telephony.Address;
import javax.telephony.Call;
import javax.telephony.Connection;
import javax.telephony.InvalidArgumentException;
import javax.telephony.InvalidPartyException;
import javax.telephony.InvalidStateException;
import javax.telephony.MethodNotSupportedException;
import javax.telephony.PrivilegeViolationException;
import javax.telephony.Provider;
import javax.telephony.ResourceUnavailableException;
import javax.telephony.Terminal;
import org.devrealm.jtapitutorial2.bootstrap.ProviderService;
public class JTapiMakeCall {
private static Provider provider;
public static Call dial (String origAddrStr, String dialoutNumber) {
    Provider provider = JTapiMakeCall.getProvider();
    Call call = null;
    try {
        Address myAddr = provider.getAddress(origAddrStr);
        Terminal myTerm = myAddr.getTerminals()\[0\];
        System.out.println("Calling from: " + origAddrStr + " to: " + dialoutNumber);
        call = provider.createCall();
        call.connect(myTerm, myAddr, dialoutNumber);
    } catch (InvalidArgumentException e) {
        e.printStackTrace();
    } catch (ResourceUnavailableException e) {
        e.printStackTrace();
    } catch (InvalidStateException e) {
        e.printStackTrace();
    } catch (PrivilegeViolationException e) {
        e.printStackTrace();
    } catch (MethodNotSupportedException e) {
        e.printStackTrace();
    } catch (InvalidPartyException e) {
        e.printStackTrace();
    }
    return call;
}

public static void disconnect (Call call) {
    Connection\[\] connections = call.getConnections();
    for (Connection connection : connections) {
        //disconnect here
    }
}
}
This class provides some methods to get useful information about a call.
The methods it provides are the following:
Following is the source code of the CallTools class:
package org.devrealm.jtapitutorial2.dialout;
import javax.telephony.Call;
import org.devrealm.jtapitutorial2.jtapicalltools.CallTools;
import org.devrealm.jtapitutorial2.jtapimakecall.JTapiMakeCall;
public class Dialout {
public static void main (String[] args) {
String origAddrStr = "1234";
String dialoutNumber = "00123456789";
// Optionally you can accept the original address and dialout number from the command prompt
// String origAddrStr = args[0];
// String dialoutNumber = args[1];
Call call = JTapiMakeCall.dial(origAddrStr, dialoutNumber);
CallTools.inspect(call);
try {
Thread.sleep(10000);
} catch (InterruptedException e) {
e.printStackTrace();
}
System.out.println("Disconnect Call");
JTapiMakeCall.disconnect(call);
System.out.println("...............");
CallTools.inspect(call);
JTapiMakeCall.shutdownProvider();
}
}
The Call and Connection interface are straight forward and easy to work with and the documentation provided is well written. Using these two interfaces we can easily integrate an application with a PBX and give a production boost to a call centre. Going back to the use case defined at the begining of the article, the connector for the auto-dial functionality and integration with the PBX is ready to use. Of course that kind of application needs a lot more to be complete but this library is one of the most, if not the most, important part of the application. What is left to see is how we can answer, transfer, conference and observe calls so we can give a call centre with full set of automatic tools to handle both incoming and outgoing calls. Specially the observers that the JTapi API provides are useful to implement applications that observe addresses, terminals or calls for incoming traffic and captures details of the caller that can be used to popup the agent's desktop with the caller details. Finally please share any comment or idea derived from this article since that's the driving power of thought and any effort made here.